Stinky's birthday is coming up, and one of the things he requested was a camcorder. When I told him we already had one, he was surprised! (That should tell you how often we use it, since he totally forgot about it.) I asked him why he wanted one, and it turns out he likes the LEGO stop motion movies on YouTube and thought it would be fun to make one of his own. He has done some movie-making before - both at school and at SEP.
So I dug out the camera and told him to have fun. He was - in a word - ecstatic. We set some ground rules about it's use (No filming anyone without their permission. No walking/running/biking/etc while filming... yet!). He plugged it in and gave it a good charge, and then turned it on to record his first movie.
Ooops. In big, unfriendly letters, there was an error message. It flashed, "Condensation Operation Paused" and then "Please Wait".
So we did. For about an hour. Then we tried again and got the same error. Hmmm... So I plugged it in and left it turned on for another hour. Still no change. I checked the manufacturer's website (JVC) for information - nothing. It was time to ask Google what to do next...
Apparently I wasn't the only one having this problem, because there were LOTS of message groups discussing this very issue. I tried what seemed to be the least invasive path (cleaning a sensor with a Q-tip) first, but that didn't help. I looked and looked for other options, and came to the conclusion that I would have to take apart the camera and manually reset the sensor.
Now, there were lots of places where I found a basic description of the process. But I never did find one with details. The closest I could find was something like this:
- Remove power and battery
- Remove screws (some sites said 15, others said 18, most weren't specific)
- Case should now come apart easily
- Unplug connector near eyepiece, wait 5 minutes then reconnect
- Put back together.
In short? It worked!! Stinky is now the proud owner of a camcorder. (And yes, we are still going to get him something else for his birthday.) But for my future sanity and maybe someone else's... click here for more specific instructions!
Disclaimers and warnings: I am not a certified JVC technician. If your unit is covered by a warranty, I recommend returning it to the manufacturer for a repair. Following these instructions is an "at your own risk" activity. If you attempt these instructions and you end up with a non-functioning camcorder I can't rescue you.
I recommend taking out all twenty-one screws, so as not to leave any question whether you missed one. This is probably more screws than you actually need to remove. If you have fat fingers and can't manage teeny, tiny, almost microscopic screws either find a friend (with small fingers or better dexterity) to help, or take it to someone who does this for a living and hopefully won't lose your screws.
In short, if you want to be certain that your camcorder will work don't follow these instructions at all and get thee to a certified JVC repair shop instead. Mmkay?
Instructions for "fixing" a condensation error on a JVC GR-D30U MiniDV camcorder
- Find yourself a large, flat work surface and cover it with a towel. (Screws roll around on flat surfaces. That's a bad thing.)
- Make yourself a list of the screw locations (handy descriptions are included with each step, but use something that makes sense to you). As you remove the screws from the case, place them next to their description. There are lots of teeny, tiny screws, and most of them look identical... but only from the outside of the camcorder case!
- If the camera is plugged in, then unplug it. Remove the battery from the back of the camera. Remove any other misc cables or straps - they will just get in the way. You don't have to remove a tape, if one is inserted.
- Remove the screws from the battery compartment:
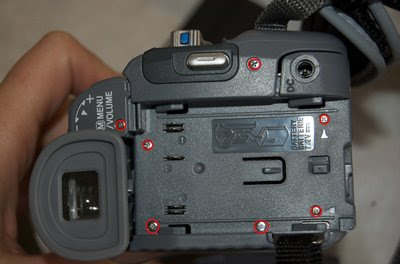 I labeled these (starting by the eyepiece) "menu/volume", "top left battery", "top right battery", "center battery", "record button", "bottom left battery", and "bottom right battery".
 - Remove the screws from the top of the camcorder:
 I labeled these "top center" and "top near zoom".
 - Remove the screws from the bottom of the camcorder:
 I labeled these (starting on the side closest to the battery) "above battery release", "tape door, battery side", "right of battery release", "above plastic rectangle", "left of tripod mount - top", "left of tripod mount - bottom", "tape door, lens side", "right of tripod mount - top", "right of tripod mount - bottom", and "under microphone" .
 - Remove the screws from under the LCD viewfinder:
 I labeled these "speaker" and "stop button". Note: to allow easier access in order to remove the screw next to the stop button you can swivel the screen.
 - Move away from the screws. I am assuming you have carefully arranged them next to the list of where they were removed from. You don't want to disturb the little buggers, right?
- Carefully pull the camcorder apart. It should split right down the middle. A little plastic piece from the top will pop out - set it aside. The side with the LCD screen will separate from the rest of the unit.
- There is a little off-white connector with black and red cables coming out of it. If you are familiar with computer innards, it looks a lot like a mini version of a hard drive power cable. It's near the eyepiece. Unplug it. (Sorry - no pictures. If I have to open mine again I will take one!)
- Hold your breath, do the hokey pokey, take a pee break. Whatever... after a few moments plug the connector back in.
- Carefully put the camera back together. Slide that little plastic piece back in where it belongs (there is a screw hole that clips underneath the main body of the camera). Make sure you don't crimp any cables or pinch any fingers.
- Replace the screws you removed in the earlier steps. I went in the same order I removed them, just so that I didn't get lost.
- Replace the battery.
- Cross your fingers. If you can, cross your toes. Knock on wood.
- Turn on camcorder... and hopefully start making movies!!


That's all folks! Hope this is helpful to someone out there. I hope we don't have this problem again because honestly, it was a PITA to take this little bugger apart. Putting it back together - not so bad. In any case I am glad it is working again, and REALLY happy that Stinky is having some fun with it!
3 comments:
Doesn't it feel great when you tackle something absurdly impossible and succeed?!? We're so clever! Nice work! Now, can you replace the speaker in a Dell laptop? They sent me the speaker when I declined to send them my laptop for a few weeks. Just a lot of screws, right?
He was surprised you owned a camcorder...that was hilarious! I love the internet, for all these magical instructions which seem impossible to find elsewhere! Last week I had to find how to remove a stuck disc from a dvd player. Internet to the rescue...
So, I'm 5 years late to the party, but I wanted to let you know I used your instructions to fix my old camcorder that stopped working about 5 years ago. I was just about to throw it out, but thought I'd give it one more try. It seems like I've been finding more and more things on the internet after waiting a while for the information to catch up.
Anyway, everything works now! One thing to mention in picture 7, you forgot to also show that the screw next to the firewire port needs to be removed. I just about broke my camera trying to pry it apart with this screw still in.
I'm really thankful I found this...now I can offload all the videos of my kid growing up onto DVD that we haven't seen in 5+ years and I can finally get rid of this thing. :)
Post a Comment